
Securing the API Front Door: Battling Complexity
API Identity and Access Management (IAM) is supposed to be simple. At its core, it’s just about checking who is asking, what they want to do, and where they want to do it. Easy, right?
So why does every conversation about IAM turn into an alphabet soup of RBAC, ABAC, PBAC, ACLs, scopes, and attributes?
IAM at its core is really simple! Here’s a basic user story:
As a user I want to perform GET on https://api.signicat.com/organization/123/users API endpoint
When designing an authorization system, there are some primitives that must be present
- The thing to protect: api.signicat.com/organization (API)
- The action which is protected (GET /users)
- The scope or context of access: (organization/123)
- Binding between user, action and scope: permission (User A can perform action GET /users in scope /organization/123)
A relational database schema for assigned permissions then looks something like this:
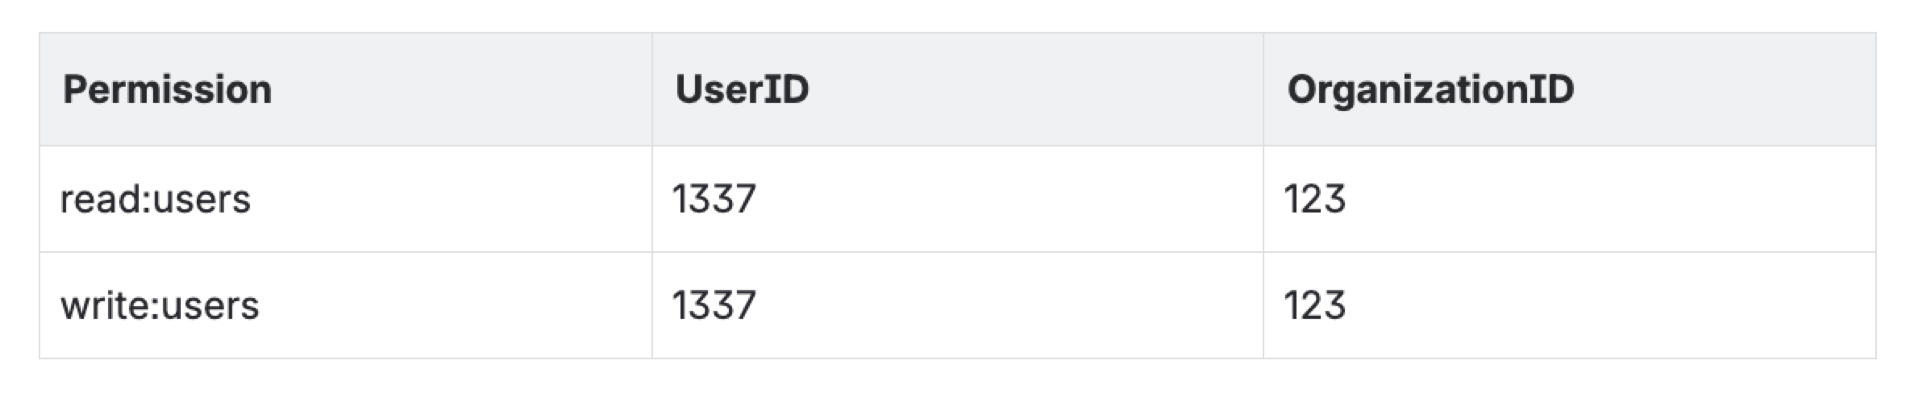
In this table, the 1337 user has been granted permission read:users and write:users permission for organization 123.
So far so good. Easy, right? What could possibly go wrong? Enter: implementation

A few years ago, Signicat was starting a project to merge multiple technology stacks. This meant we were in a position to “green field” authentication and authorization. Start fresh. Keep it simple. Over the years, it evolved, and became … complex!
Authentication - OIDC
In order for the API to validate that the requester has the required permissions, it needs to ensure that the caller is in fact who they claim to be. This is authentication. Users need to be authenticated. Each API endpoint needs to validate the authentication. For distributed API access, it’s a big advantage not to hammer the database on every single request. OpenID Connect (OIDC) does this really well with JSON Web Tokens (JWT). These are self-contained through cryptography. You pre-configure a set of trusted token issuers, download and cache their public key and validate if the token has been issued by a trusted issuer using this key. Signicat develops its own certified OIDC server, so it became the natural choice.
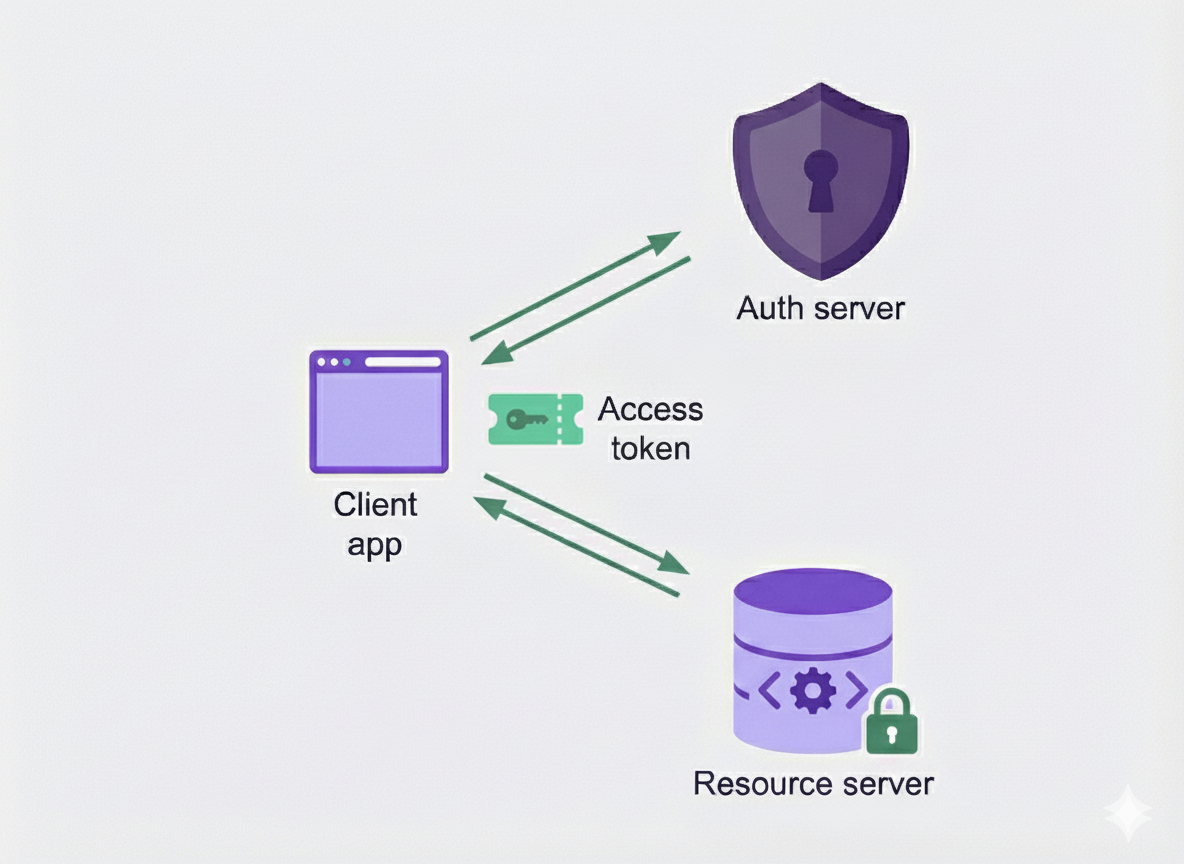
As a security enhancement Signicat puts a short lifetime on the access token (600 seconds), to minimize the impact of losing an access token. A refresh token is issued alongside the access token but has a longer lifetime than the access token. When a client needs to use an access token and the current access token has expired, the client can exchange the refresh token for a new access token.

Second iteration - Backend For Frontend
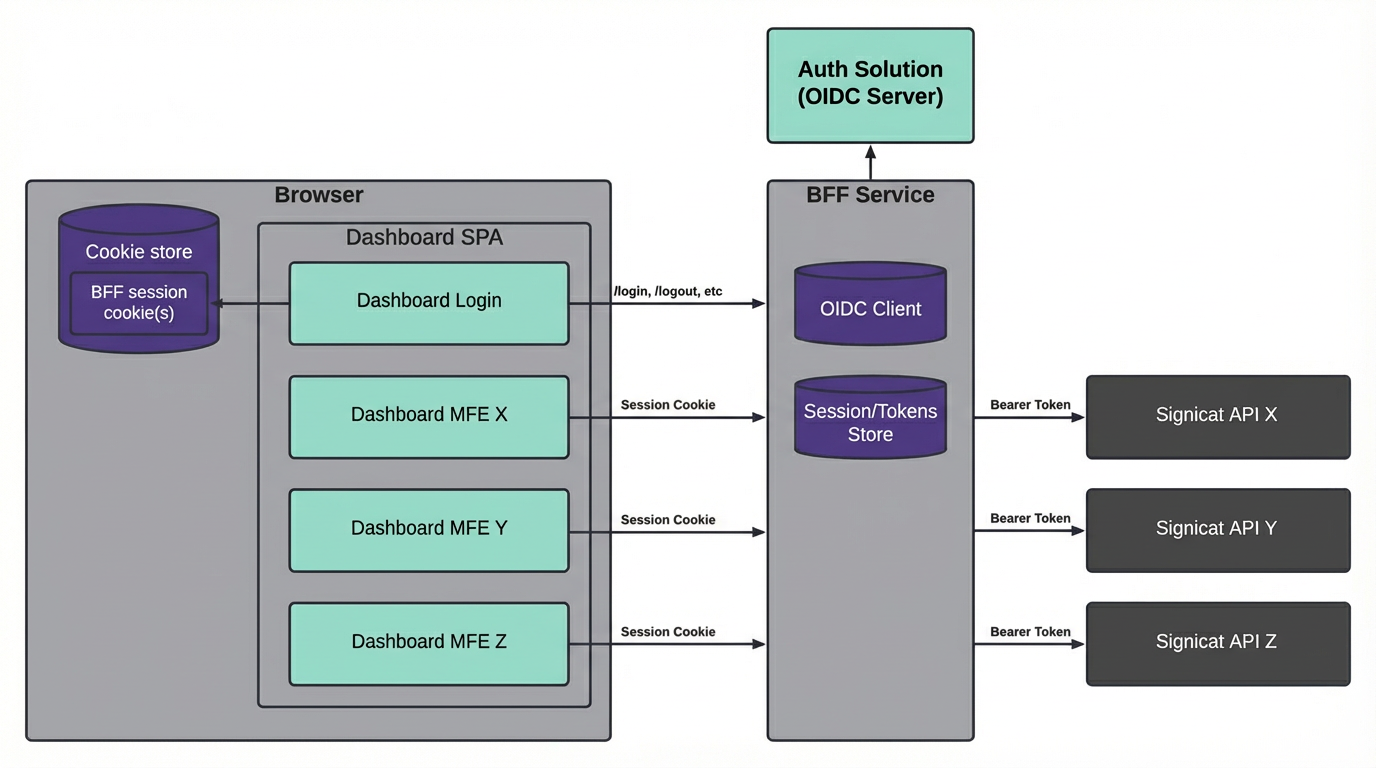
This set up served us well in the first iteration, but we quickly identified an improvement with our self-service dashboard. With the naive implementation, JWTs were stored in the browser after logging into the dashboard in order to access underlying self-service APIs. To increase security, the token lifetime was fairly short, but short-lived access tokens in the frontend did not yield the best user experience with rampant expired sessions. We were also conscious about the risk of token leakage. If a power user logs into the dashboard, the token could be used also for APIs not directly related to self-service as a side-effect of the implementation.
We then decided to revamp the full dashboard login system, and introduced a dedicated Backend For Frontend (BFF) component with session cookies. This moves the token out of the browser, and stores it in the user session in the backend. With Signicat's zero-trust architecture, the BFF uses this token to authenticate proxied requests against the APIs. This way, the existing APIs will authorize and authenticate requests using tokens just like before.
First Iteration

Second Iteration with BFF
Third iteration - mTLS feature
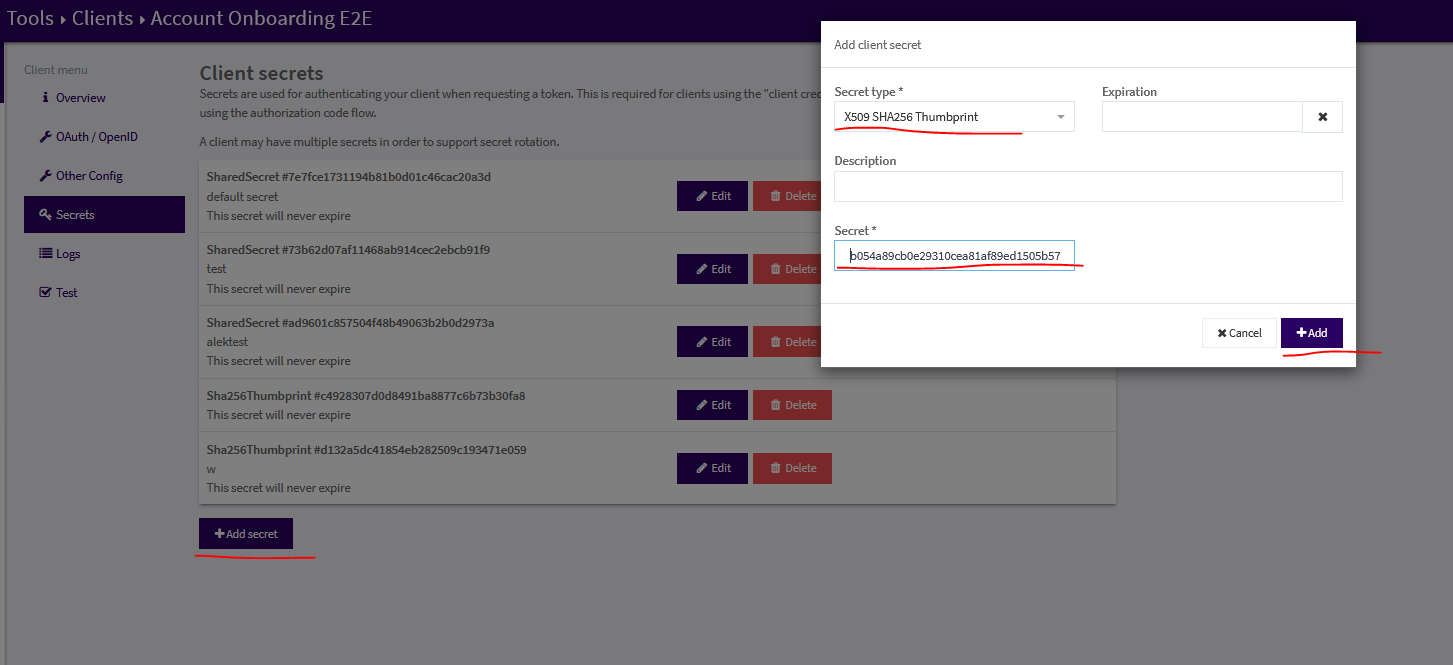
Signicat has many enterprise customers across regulated industries and government. These customers sometimes represent more exotic requirements. One such requirement is to support mTLS for authentication. This approach to client security predates OAuth, and can be a bit cumbersome to implement. As we wanted this as an addon instead of a replacement, we implemented RFC 8705: OAuth 2.0 Mutual-TLS Client Authentication and Certificate-Bound Access Tokens
This meant a new client secret type “X509 SHA256 Thumbprint” with a SHA256 hash of the public certificate. This authentication method was enabled on a specific mTLS configured hostname, such as customerx.mtls.signicat.com. When using this authentication mechanism, the resulting access token will contain the claim cnf.x5t#S256, which contains the SHA256 hash of the certificate used for mTLS. This way the mTLS client certificate is linked to a defined API client which represents the authenticated user.
Fourth iteration - SWIM* feature
For synchronous communication between microservices, each service will have their own client credentials to authenticate against APIs. Signicat quickly gained hundreds of microservices, each with their own set of secrets to safeguard. Service-to-service tokens generally have a fair amount of privileges, and having a large amount of these flying around in pipelines and systems represents operational and security risks.
Signicat uses Istio service mesh for inter-service traffic encryption. Why? Because for Signicat, it simplifies our architecture (yes, really!).
The Istio mTLS certificates contain a SPIFFE ID linked to Kubernetes service accounts. This allows us to bind the token to a specific workload:
- No more authentication secrets to manage manually
- Workload bound tokens
The relevant token claims then look like this:

*Signicat Workload Identity (in-)Mesh (SWIM) also has a full write-up available here: Introducing SWIM: Signicat Workload Identity… - Signicat
Authorisation
Validating the authentication suddenly became quite complex now! Notice that the route of basic auth with username and password in a header for API calls is nowhere to be found! Instead we have JWTs and mTLS (and session cookies). All authenticated APIs need to validate all requests. Adding that Broken Access Control is a top risk on the OWASP Top 10 Web Application Security Risks, we have no choice but to get this right.
One of the additional challenges of Signicat was that we have multiple technology stacks in the mix from acquisitions. Java, .Net and PHP cannot really share a single library across microservices to correctly validate authentication. We also need a bit of logic to deal with Authorization. After the API has validated that you are who say you are (authentication), we still need to determine if you have access to perform the action.
The result was to create a dedicated platform service to offload this logic across all microservices. But how?
Permissions architecture
Assigning a permission to a user seems easy enough? But where to store and access this information in a request? We could store the permission as a claim in the token, but this quickly creates huge tokens to send back and forth for the amount of available permissions with an ever growing set of services. Also, the sheer amount of permissions you end up with when granular to individual actions is staggering. A common approach to this is to group a set of permissions into roles. When the role is assigned to a user, it is in fact the whole set of permissions which is assigned. Keeping in mind that assigning individual permissions directly is still very useful when granularity is needed, such as with machine-to-machine clients. If we didn’t support this, we’d quickly end up with more roles than permissions overall.
Another dimension is the scope. Let’s say you assign a read only role to a user. This read only role probably should not be able to read all data about all customers and all internal systems! Assigning permissions and roles should happen in a context. One example context is customer scope. Once you have scope, you’ll immediately get an expectation that they are inherited into child scope. Say you have read only on a customer organization account, which has multiple sub-organizations. This introduces inheritance.
If you want someone to access all the things, except this very secret one - it’s tempting to enable negative permissions. Effectively a DENY rule in an access control list. However, in larger systems, these quickly become difficult to reason about as a human.
The permissions design then became:
- Single source of truth for roles and permissions (database)
- No support for negative permissions
- Both roles and individual permissions can be assigned
- Support permission inheritance
Implementation
With the requirements settled, now we “just” need to implement:
- Authentication validation
- Permissions check
In the first iteration we decided to go with Open Policy Agent (OPA) which means defining access policies in Rego. All authenticated API services got bundled with an OPA side-car. This design required all services to make a REST API call to OPA http://localhost:8181/authz which returned a result boolean and some metadata

A common Rego bundle / policy was created to:
- Require valid token
- Check token is not out of date
- Check cryptographic signature against public key from key issuer
- Validate the key issuer is a trusted issuer
- Require account permission
- Ensure account is valid and active
- Flatten permissions: Extract roles, combine with direct and indirect (inherited) roles and permissions
This Rego policy bundle was built into the side-car container as a versioned artifact in the container registry. For more dynamic information, OPA would retrieve and cache from dedicated microservices:
- Public key from token issuer (OAuth service)
- Users, roles and permissions (IAM service)
- Valid organization accounts (CRM service)
When the rubber hits the road
While Open Policy Agent is very flexible and served us well, it’s also limited. We quickly ended up standardizing on one set of policies (logic) - because of the high degree of interconnected microservices. Also, it turns out Rego wasn’t everyone's favorite language to use. And the technology organization were generally happy to use common policies.
We also hit some scaling issues with the initial design:
- Bugs in OPA itself discovered under high load (now fixed!)
- Config drift in side-cars. Updating bundled policy or OPA version required restart of all services
- Excessive cache replication when each side-car has separate cache
- Substantial amount of cache refresh, with caches expiring across 100s of side-cars
To mitigate #2 and #3 OPA was centralized into a single deployment. This significantly reduced the overall ram usage and load on OAuth, IAM and CRM services.
Yet, there was still some shortcomings which we wanted to address:
- Long dependency chain, where services OPA depends on becomes part of the critical path for all authenticated APIs
- Cache miss introduced a latency hit on requests. Since authorization validation is a blocking call, API latency spikes would happen seemingly randomly
- Rego competency was scarce and confidence in the security decreased when policy complexity increased
On top of this, we wanted to significantly expand the supported features:
- Customer url to AccountID mapping
- Product check, ensuring payment was in order before allowing the request
- Uniformly introduce quotas and rate-limits on APIs as an authorization step
- Integrate with Istio AuthorizationPolicy as an alternative to call OPA from code
- Legacy system support, for integrating acquired companies tech stack
- Tokens from legacy systems and API facades
- Permission (or roles, context) mapping from legacy
While we looked at modifying OPA to our needs, we ultimately decided that the customizations scope outgrew what OPA was originally designed to solve.
Signicat Authorisation Server
At this point, the Rego policies had converged into a single set of policies. This allowed us to part ways with Rego and implement a more static policy using a programming language the wider Signicat is more familiar with. In order to keep backwards compatibility, we kept the API specification intact and re-implemented it into the Signicat Authorization Server (SAS). Leveraging the existing tests to validate correctness.
Once that was done, OPA was officially deprecated, and we started getting to work on the more advanced features.
Multi-layered cache
Since SAS is very much in the critical path of API calls, latency matters a lot. In order to eliminate cache misses, we wanted to pre-fill cache on startup. Using the Kubernetes startup-probe, we can ensure that no requests reach the instance until the cache is populated. Once data is downloaded from dependent systems (OAuth, IAM, CRM), it gets put in a shared Redis cache in addition to in-memory cache.
Instead of expiring cache objects with a TTL, we rely on publisher/subscriber events to update the cache upon updates in dependent systems. In addition, we implemented a separate worker thread to periodically pull the full data set as a fail safe (belt and suspenders!)
With this design, we were able to remove several systems from the critical path. Meaning an outage of IAM or CRM systems does not block API authorization.
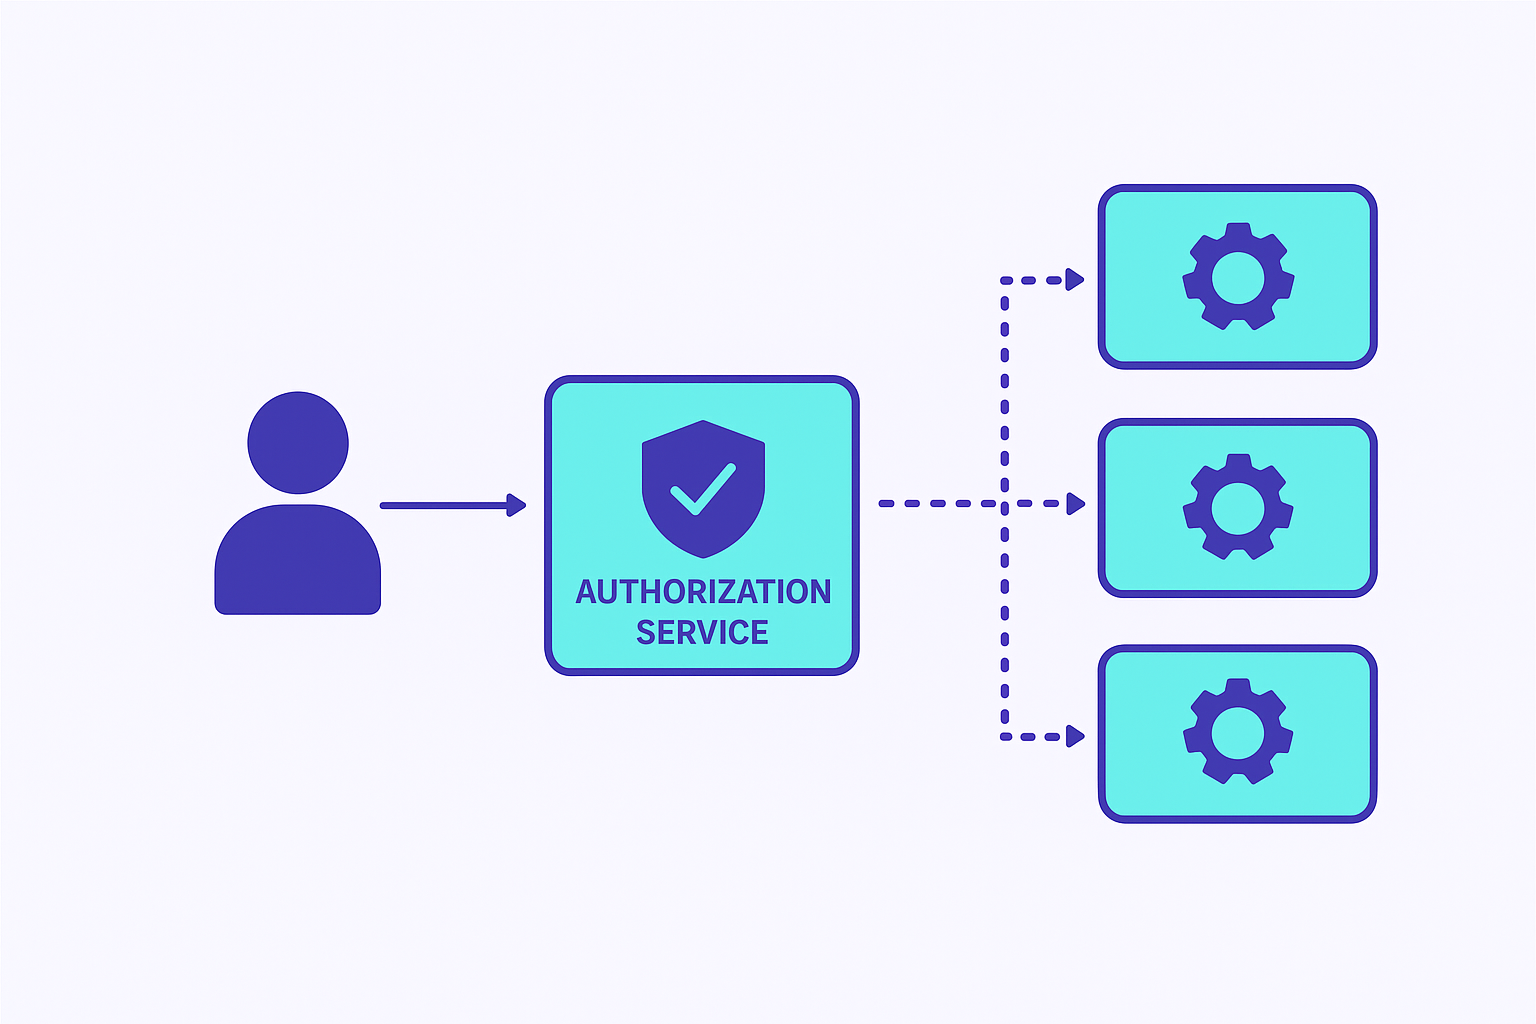
Simplify usage
In Signicat, we leverage Istio service mesh. This means that all HTTP requests uniformly pass through an Envoy reverse proxy. By creating an Istio->SAS integration, it allows Istio to authorize HTTP requests before they reach the target service. HTTP requests will only reach the service if they are authorized. Unauthorized requests will be blocked by Istio (Envoy). That way microservices can outsource the Signicat Authorization Service integration to the Envoy reverse proxy.
Requests reaching the service then contain special HTTP headers containing information about the authorization;
- Subject ID
- Target account or organization
- Products and permissions
The configuration for Istio to make this work, requires:
- An
AuthorizationPolicytelling Istio to use SAS for external authorization - An
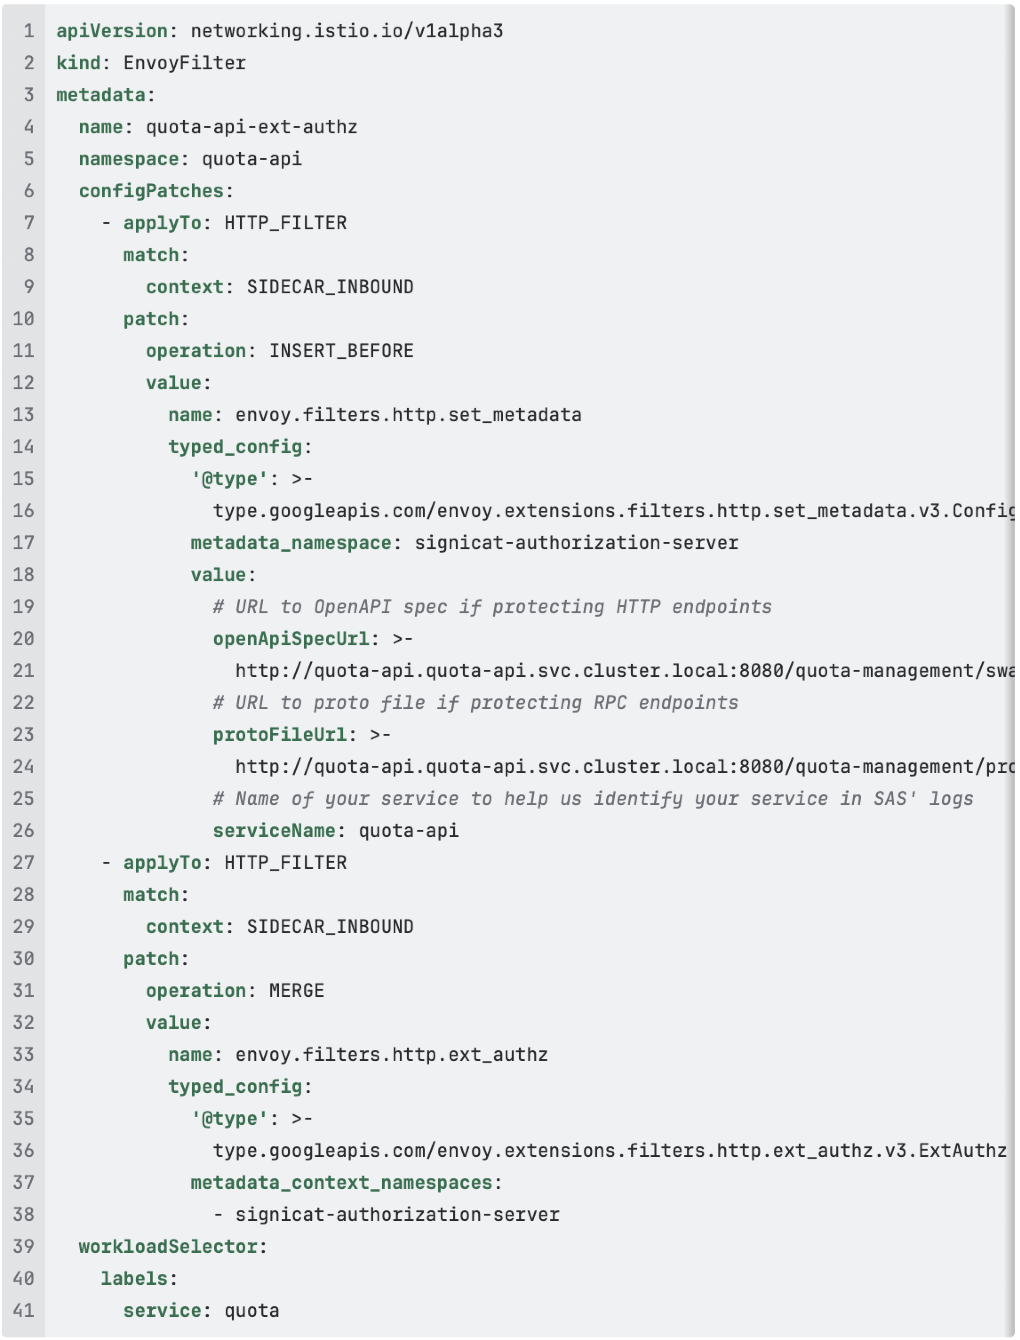
EnvoyFilterconfiguring Istio to provide SAS with an URL to your OpenAPI spec/Proto file
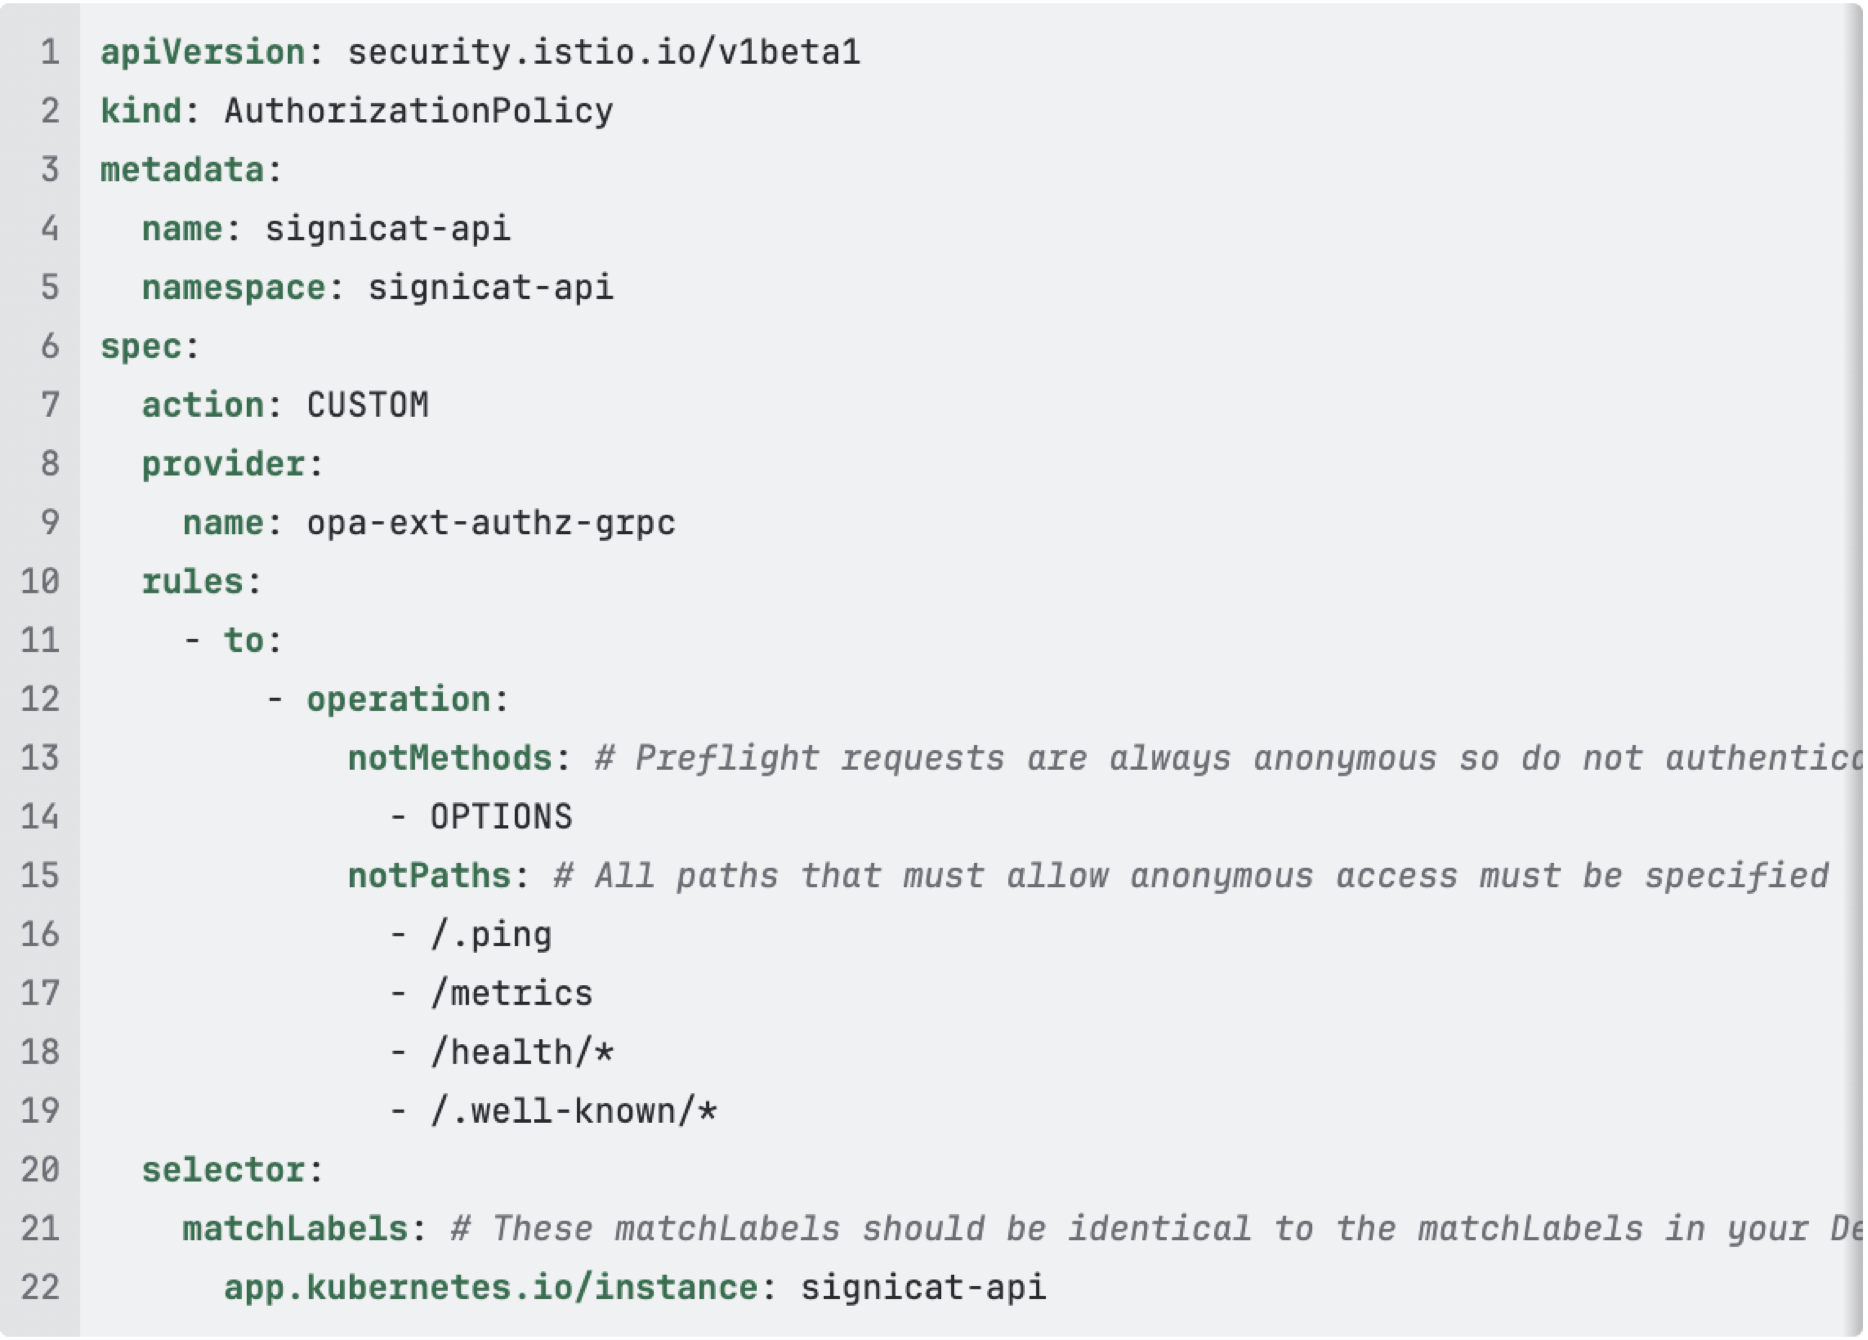
The EnvoyFilter is required to provide SAS with enough details to perform the authorization.
Below is an example for the Quota API. The 3 values that must be configured by each service are openApiSpecUrl, protoFileUrl (if using RPC), and serviceName
Are we done yet?
Probably not. Features keep coming. New ideas about security and performance keep popping up. But what does it all look like now? This beautifully simple architecture, which powers Signicat API authorization today. Enjoy!
![]()
Post-script. Developer Experience
This solution is now part of the Signicat Internal Developer Platform offering. You need API authorization? This is how:
- Create your Hello World app
- Add AuthorizationPolicy and EnvoyFilter into your Helm chart for authorization
- Deploy your Hello World app
- SWIM will automatically create an API client
- Add any service dependency permissions to the generated API client as needed
- Profit!